 English (UK)
  Русский (RU)
 MANUAL
on DOS EXCLUSIVE Decking Installation
General Information
DOS EXCLUSIVE decking boards may differ in their design and have different mounting methods:
- seam board. During installation, a gap is made between the boards.
Installation of the DOS EXCLUSIVE decking is easy and should not cause any problems. Decking is a self-supporting flooring for garden terraces, verandas, garden paths, balconies, etc. It can be laid both straight and diagonally.
Decking joists 55x33 mm and decking boards 135x25 mm, made of WPC, can easily be drilled, sawed, etc. using power-driven and hand-held woodworking tools.
When in service, the decking does not require special care, but if it becomes very dirty, it is advisable to clean it immediately. It should be washed lengthwise, using warm water and standard household cleaning agents.
Preparing for Installation
DOS EXCLUSIVE decking shall be stored in a dry place, away from sunlight. A closed room is preferable. Boards shall be kept in their original packaging and placed horizontally. Do not remove the packaging and saw boards in advance. It is better to do this during the actual installation. Following these simple rules will prevent the material from bending and deforming.
Wood-plastic composite products shall be installed in the warm season, at temperatures above +5 °C. It is not recommended to install them at low temperatures, on surfaces covered with snow and ice.
In summer, it is better to choose a cloudy day or early morning for installation so that the decking will not be exposed to direct sunlight. The problem is that a loose board may be warmed up unevenly. This may cause it to bend, which will significantly complicate its installation.
When choosing the direction of lay, several rules should be kept in mind:
If the terrace is elongated, it is better to place the board along the short side. This way, there will be less joints and less change in board length in case of temperature or humidity fluctuations. This will make installation and operation much more easier.
At the entrance, it is usually recommended to lay the decking along the wall with the door. This installation method is considered more aesthetically sound and provides better anti-slip properties (when using a material with the velveteen surface).
Based on these rules, the direction of lay should be chosen in advance, and the design of all elements of the terrace should be thought through. We do not recommend to solve these questions along the line. This approach often leads to excessive material consumption, errors, and design flaws.
ATTENTION! The WPC covering is a natural material, and (like any similar material: wallpaper, ceramic tile, etc.) its shade can change slightly from batch to batch.
Preparing Base
WPC decking shall be installed on a flat and solid surface prepared beforehand with a slope not less than 1% in the direction of lay in order to avoid high humidity under the decking that may damage the covering. A compacted base of crushed stone, gravel, concrete slabs, etc. is commonly used.
IMPORTANT NOTE: decking joists MUST NOT be installed on soil, gravel or sand! Decking joists shall have a point support. Usually it is concrete slabs with a minimum size of 300x300x40 mm (the distance between the concrete slabs along the line of laying of decking joists shall not exceed 300 mm).
When laying on a flat and solid base (for example, concrete slabs), the decking joists shall be placed directly on it on rubber pads (100x100x5 mm). The concrete base generally does not require additional preparation.
It should be noted that adequate ventilation is an important condition. Voids between elements of supporting structures are usually not filled with anything.
Installing Decking Joists
Before installation, the decking joists shall be kept at a temperature of 20±2 °C for at least 24 hours if they were previously stored at a temperature between 0 °C and 10 °C and for at least 48 hours if they were previously stored at a temperature below 0 °C. The distance between fixed stops (walls, skirting boards, etc.) and the ends of the decking joists shall be at least 10 mm.
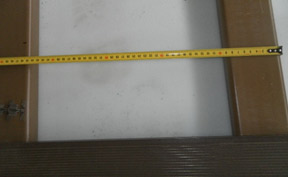
The distance between the decking joists shall not exceed 250 mm (along the axes of the decking joists) (Fig. 1). In case of heavy loads (for example, decking for sports facilities), the distance for laying decking joists shall be reduced by 2 times. If the decking is laid diagonally, the distance between the decking joists shall be reduced in accordance with the angle of laying. For example, if the decking is laid at an angle of 60°, the distance shall be 200-250 mm, and if the decking is laid at an angle of 45°, the distance shall be 150-200 mm.
The calculation of running meters of the decking joists (with 250 mm distance between them), depending on the area of the decking, is shown in Table 1.
Table 1
|
Width, m |
|||||||
|
1 |
2 |
3 |
4 |
5 |
6 |
||
|
Length, m |
1 |
5 |
9 |
13 |
17 |
21 |
25 |
|
2 |
10 |
18 |
26 |
34 |
42 |
50 |
|
|
3 |
15 |
27 |
39 |
51 |
63 |
75 |
|
|
4 |
20 |
36 |
52 |
68 |
84 |
100 |
|
|
5 |
25 |
45 |
65 |
85 |
105 |
125 |
|
|
6 |
30 |
54 |
78 |
102 |
126 |
150 |
|
Fix the decking joists on the supports using mounting band, dowels or screws.
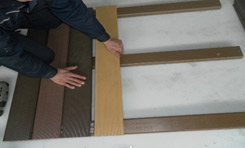
Installing DOS EXCLUSIVE Decking
When laying the seam decking, expansion gaps (minimal width 20 mm on all sides) shall be provided against the walls of buildings, garden walls, skirting boards, supports, etc.
Overtightened screws reduce strength and may cause additional damage. When screwing in screws, make sure that the head of the screw is flush with the surface.
The end faces of profiles shall be covered with either an L-/F-shaped profile or plugs made of polymer material. Plugs can only be used for strictly rectangular end sections!
Lay the DOS EXCLUSIVE decking perpendicular to the decking joists and attach it to each decking joist with stainless steel clips (Fig. 2). Make sure that the profile fits tightly against the decking joist.
 |
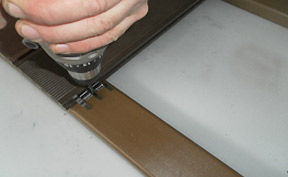 |
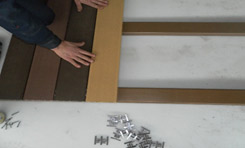
At the beginning and at the end of installation, fix the first profile with a clip or screw a countersunk screw or a self-tapping screw into the counterbored hole next to the profile jumper (Fig. 3). Don't forget to watch the position of the board. If necessary, the initial profile can be individually adjusted to the width.
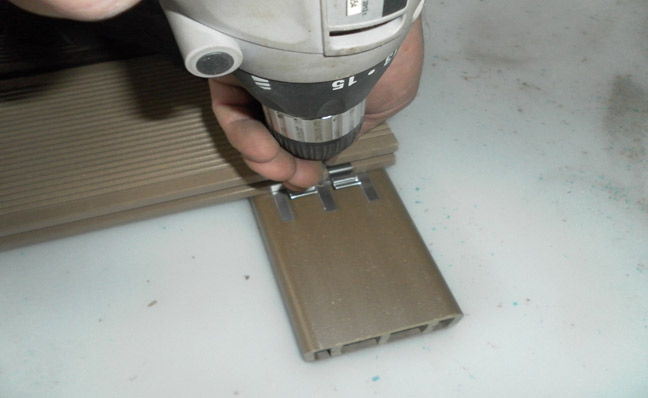
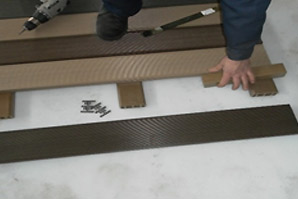
For further installation, insert clips into the side groove of the decking board where it is attached to the decking joist (along the entire length of the board so that they fit tightly and are not skewed). Then insert the countersunk screws into the holes of the clips and screw them up to the decking joist until the board is fixed in position.
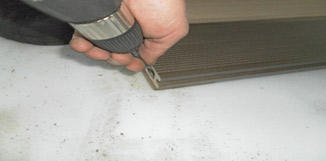
After that, insert the free edges of the clips into the side groove of the next decking board, tapping lightly with a rubber hammer and a wooden block on the edge of the board so that it fits into place, and press the board along its entire length.
 |
 |
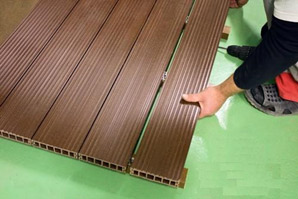
Repeat these steps for every next board until the last board is installed. At the end of installation, fix the inner edge of the last board with a clip, just like the previous boards.
 |
 |
To dismantle the decking, do these steps in reverse.
 +7 (812) 424-42-24 / +7 (921) 447-51-85
 +7 (921) 447-51-85 (WhatsApp)
 bldg. 102F, Novii Svet settlement, Gatchina district, Leningrad Region